

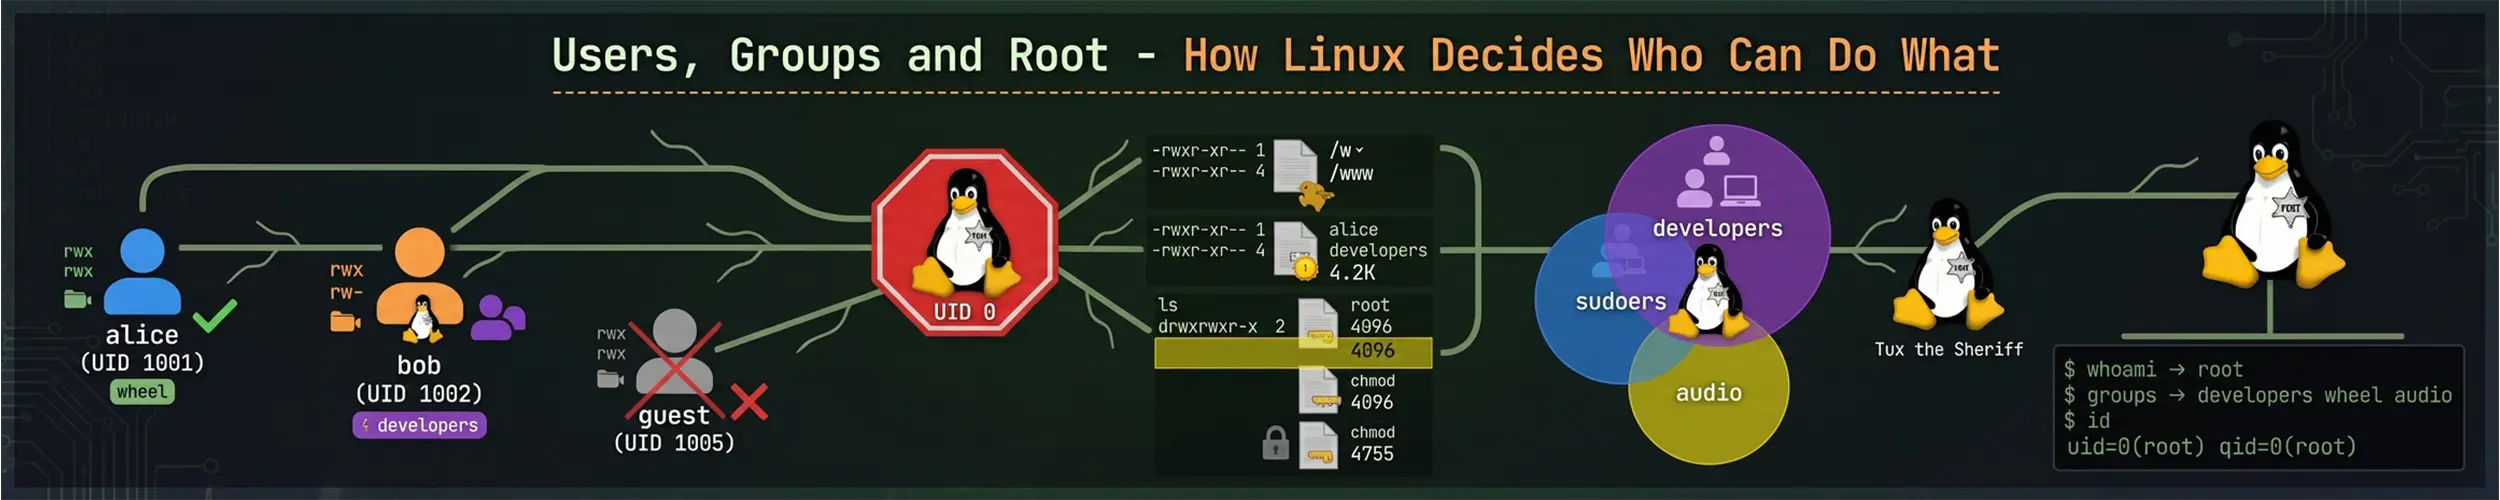
Run cat /etc/passwd on a fresh server and you will find thirty accounts on a machine one person uses. None of them are people. Understanding why is the fastest route to understanding how Linux security actually works — because almost every permission decision on the system comes down to two numbers.
Users are numbers
A username is a convenience for humans. The kernel only deals in the UID, a user ID number, and the GID, a group ID. Files store the numeric owner; ls -l looks the names up for display.
id
# uid=1000(kevin) gid=1000(kevin) groups=1000(kevin),27(sudo),998(docker)

# Show numbers instead of names
ls -lnThis has a consequence that catches people out, though not the one most people expect. Copy files to another machine preserving ownership and both tar and rsync write the owner’s name into the archive alongside the number, and both resolve by name on the way out: restore onto a machine where kevin holds 1001 rather than 1000 and the files still come back owned by kevin. The numbers travel only if you ask for them — tar --numeric-owner, rsync --numeric-ids — and almost nobody passes those flags. What bites instead is a name the target machine has never heard of. With nothing to resolve, the raw number is written, and the file now belongs to nobody.
A bind-mounted volume in a container is the case with no name resolution at all, which is why it produces such baffling permission errors: the process inside runs as UID 999, and on the host UID 999 is some unrelated service account. Nothing translates between them. On an ordinary transfer, though, the useful step afterwards is not a blanket chown — that re-asserts an ownership which is usually already correct — but asking which numbers failed to resolve: find /srv /home -xdev -printf '%u %g\n' | sort | uniq -c. Every row that comes back as digits rather than a name is a file whose owner does not exist here, and the next useradd -r will hand that number to somebody. Restore as root, keep the names, then run that. Restoring a Linux Server works through it as stage 2.
Three kinds of account
| UID | Kind | Examples |
|---|---|---|
| 0 | root | root |
| 1–999 | System and service accounts | www-data, sshd, postgres, nobody |
| 1000+ | Human users | You, and anyone else who logs in |
Service accounts exist so that a compromised program is contained. Nginx runs as www-data, not as root, so an attacker who takes over the web server gets whatever www-data can reach — usually a document root and little else — rather than the whole machine. It is the single most effective structural defence on a Linux server, and it works silently, which is why it goes unnoticed.
You can see the intent in the account itself:
grep www-data /etc/passwd
# www-data:x:33:33:www-data:/var/www:/usr/sbin/nologinThe shell is /usr/sbin/nologin. That account cannot log in at all, by design. When you create an account for a service of your own, do the same — it is one flag and it removes an entire category of risk.
Reading /etc/passwd and /etc/shadow
Despite the name, /etc/passwd contains no passwords. It is world-readable, seven colon-separated fields per line:
kevin:x:1000:1000:Kevin:/home/kevin:/bin/bash
  |   |   |    |     |       |          |
  |   |   |    |     |       |          `- login shell
  |   |   |    |     |       `------------ home directory
  |   |   |    |     `-------------------- description
  |   |   |    `-------------------------- primary GID
  |   |   `------------------------------- UID
  |   `----------------------------------- password placeholder
  `--------------------------------------- username
The x means “the hash is in /etc/shadow“. That file is readable only by root, which is the entire point of the split: programs need to look up usernames and home directories constantly, and none of them need the hashes.
# Password status for one account
sudo passwd -S kevin

# Real humans, by UID range
awk -F: '$3 >= 1000 && $3 < 65534 {print $1}' /etc/passwd

# Accounts with a usable login shell
grep -v -e nologin -e /bin/false /etc/passwdThat last command is a worthwhile audit on any machine you have inherited: it lists every account that could actually be logged into. Anything on it you cannot account for deserves investigation.
Groups, primary and supplementary
Every user has one primary group, which is the group assigned to files they create. They may also belong to any number of supplementary groups, which grant additional access.
# Add someone to a group
sudo usermod -aG docker kevin

# Check
groups kevin
id kevinThe -a is not optional. usermod -G docker kevin without it replaces every supplementary group with just docker — which typically removes the user from sudo at the same time. If that user was your only administrative account and you are working over SSH, you have locked yourself out of administration on that machine. Always -aG.
The second trap: group membership is read at login. Add yourself to a group and your current shell does not have it. Log out and back in, or start a new session with newgrp docker. “I added myself to the docker group and still get permission denied” is nearly always this.
Groups that are really administrative access
| Group | What it grants | Effectively root? |
|---|---|---|
sudo / wheel | Run commands as root via sudo | Yes, openly |
docker | Talk to the Docker daemon | Yes — see below |
adm | Read all log files | No, but reads everything |
disk | Raw access to block devices | Yes, in practice |
shadow | Read password hashes | Effectively yes |
The docker one deserves stating without hedging. A member of the docker group can start a container that mounts the host’s root filesystem and edit any file on it as root. That is not a bug — it is what a container runtime does — but it means adding someone to docker is the same decision as giving them passwordless sudo. Make it deliberately. The same is true of disk: raw block device access means reading and writing any file, permissions notwithstanding.
The name differs by family: Debian and Ubuntu use sudo, Red Hat and Arch use wheel. Check which one your /etc/sudoers actually grants before adding anyone to either.
What root actually is
Root is not a special account with a flag set. Root is UID 0, and the kernel skips permission checks for UID 0. That is the whole mechanism. Rename the account, create a second account with UID 0, and it is equally root — which is why an unexpected UID 0 in /etc/passwd is a serious finding:
# There should be exactly one line here
awk -F: '$3 == 0 {print $1}' /etc/passwdMost distributions now discourage logging in as root at all. Ubuntu ships with the root password locked; you become root through sudo instead. That is better for three reasons: sudo logs who ran what, it can be granted narrowly rather than all at once, and it removes the shared password nobody changes when someone leaves.
# One command as root
sudo systemctl restart nginx

# A root shell (prefer not to linger here)
sudo -i

# Who has sudo, and what they may run
sudo -l
getent group sudoThe sudo reference covers granting narrow permissions, which is worth doing when someone needs to restart one service rather than administer the machine.
Creating accounts
# A human user (Debian and Ubuntu: interactive, sets up the home directory)
sudo adduser alice
sudo usermod -aG sudo alice

# A human user, portable across distributions
sudo useradd -m -s /bin/bash alice
sudo passwd alice

# A service account: no home, no login, no password
sudo useradd --system --no-create-home --shell /usr/sbin/nologin myappadduser is a friendly wrapper around useradd and only exists on Debian-family systems. useradd is universal but does nothing you did not ask for — notably, without -m it creates a user with no home directory, which produces a confusing broken login later.
Removing accounts
# Lock the account without deleting anything (do this first)
sudo usermod -L alice
sudo usermod -s /usr/sbin/nologin alice

# Find what they own before deleting
sudo find / -user alice -not -path '/proc/*' 2>/dev/null

# Delete, keeping the home directory
sudo userdel alice

# Delete, removing the home directory too
sudo userdel -r aliceLock first, delete later. Deleting an account leaves its files owned by a UID with no name, and if you later create another user the numbers get recycled — the new person silently inherits the old one’s files. Locking is instant, reversible, and buys you time to find out what they owned.
Also check for scheduled jobs and SSH keys, both of which outlive a casual account removal:
sudo crontab -u alice -l
sudo cat /home/alice/.ssh/authorized_keysThings that catch people out
| Symptom | Cause |
|---|---|
| Added to a group, still denied | Not logged out and back in |
| User lost sudo after a group change | usermod -G without -a |
| Copied files owned by the wrong person | The name resolved to a different number on the target — or the copy was made with --numeric-owner or --numeric-ids. See Restoring a Linux Server |
| Files owned by a bare number | The account was deleted — or the files arrived from another machine and that name does not exist here |
| New user cannot log in | useradd without -m, or a nologin shell |
| Container cannot write to a mounted directory | Container UID does not match the host owner |
| Service runs as root unnecessarily | No dedicated service account was created |
Quick reference
| You want | Command |
|---|---|
| Who am I, and in what groups | id |
| Members of a group | getent group docker |
| Add to a group, safely | sudo usermod -aG GROUP USER |
| List real human accounts | awk -F: '$3>=1000 && $3<65534 {print $1}' /etc/passwd |
| Check for extra UID 0 accounts | awk -F: '$3==0 {print $1}' /etc/passwd |
| Lock an account | sudo usermod -L USER |
| What a user owns | sudo find / -user USER |
| Create a service account | sudo useradd --system --shell /usr/sbin/nologin NAME |
There is a much longer version of what happens when one of these accounts actually arrives. The Life of a Login follows the seven stages between someone typing a password and having a usable shell: the three binaries sshd has become, PAM’s stacks and why a key-based login skips one of them entirely, which password hash your machine is really using, the account checks that run even when authentication did not, session classes and the one sentence that explains every broken systemctl --user, where PATH comes from, and what survives your logout.
Related reading
- Restoring a Linux Server — the long one: which of the two identifiers actually travels, and everything else a restore decides that the backup did not
- File permissions — what those UIDs and GIDs are checked against
- sudo — becoming root properly, and granting narrow access
- The Linux filesystem — where
/etc/passwdand home directories sit - Securing a new server — creating the first non-root account
- ssh — keys, and which account they belong to
- Migrating a server — moving to a new machine, and the ownership step it prints when the files arrive